
Whether at work or for personal projects, we often need to give training or show someone how something works and loom is the easiest tool to do this.
We can go into a meeting online or even in person, but that usually takes up a lot of time.
So an interesting solution is to record our screen and/or webcam to pass on this knowledge or procedure. And that's where another challenge usually comes in: the technological side, which is exactly where Loom shines.
Instead of having to install complex software, configure it and then find a way to send these videos to our clients, Loom offers a simple solution integrated directly into your browser.
In this article I want to show you a little more about this free tool that helps me so much in getting training, information and assessments to my clients.
If you're not already familiar with this series here on the blog, I tell you a little about the tools I use today to work and organize myself as a freelance professional. Some of the tools I've looked at
- Calendly – Stress-free appointment scheduling
- Focusmate – Find a partner to work with online
- Toggl – Manage your time better
- Notion – Organize your digital life in one place
- Whereby – Make online videoconferencing simple
What is loom?
Loom is a screen recording tool that is installed as a browser extension. You can create up to 25 videos for free and share them with anyone you want. You can also edit videos in loom, among other interesting features.
How does Loom work?
The Loom tool aims to record your screen and/or webcam with one click. What's more, as soon as you've finished recording, the system automatically uploads the video to the cloud and makes it available for playback via a single link.
The first step is to create an account on the Loom website and install the extension for your browser. The service's start-up system is very intuitive, so it should be easy for you to get to the point where the tool is installed in your browser.
You'll see the extension available on the right-hand side of your browser's address bar.

Just click on it to start recording. You'll see a screen like the one below:
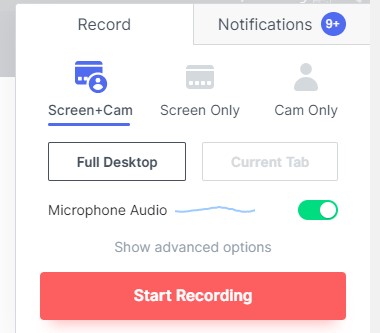
You can choose whether you want to record your screen together with your webcam, just your screen or just your camera.
Another option it also gives you is to record just the tab that is open in your browser or your entire screen.
One tip to make sure that the audio is working properly is to see if the “Microphone Audio” line is moving. If so, then the microphone is working. If not, you'll need to configure it in the advanced settings.
To access these other settings, click on “Show advanced options” and you can select the correct microphone and camera.
Once everything is correct, just click on “Start Recording” and a countdown will appear on the screen to show you when the recording will start.
To finish recording, you'll have to click on the green finish button in the bottom left-hand corner of the screen.
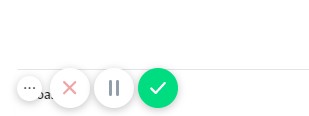
You can also pause a recording or discard it using the other two buttons on the side. The ‘X' to discard and the ‘||' to pause.
When you finish recording, the system will open a new tab in your browser with the link to the video.
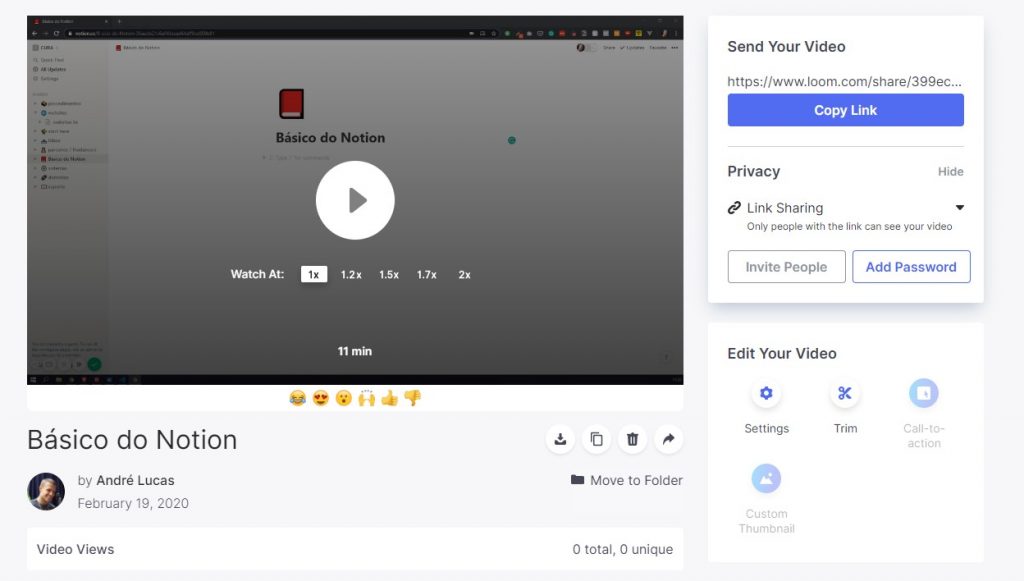
You can copy the video link and send it directly to your clients or anyone else who needs it.
Conclusion
What attracts me most about this tool is its simplicity. With just a few clicks we can do things that would take much longer.
In the past, I had to use software like OBS – which involved a lot of complicated settings – upload it to YouTube or another video hosting service and then send it to my clients.
I now use this tool to record entire training sessions on how my clients can use the websites I develop, I evaluate the services of freelancers I hire and I even record tutorials for YouTube.
Did you already know about this tool? Do you know of any other good ones that also help you record your computer screen with ease? Let me know in the comments.
Have fun!